Monday, September 23, 2013

Cockpit Sole Extraction - Check and Mate

The weather was stunning yesterday, and with no other pressing commitments/errands to attend to, I was able to get stuck into some more work on Sentina.

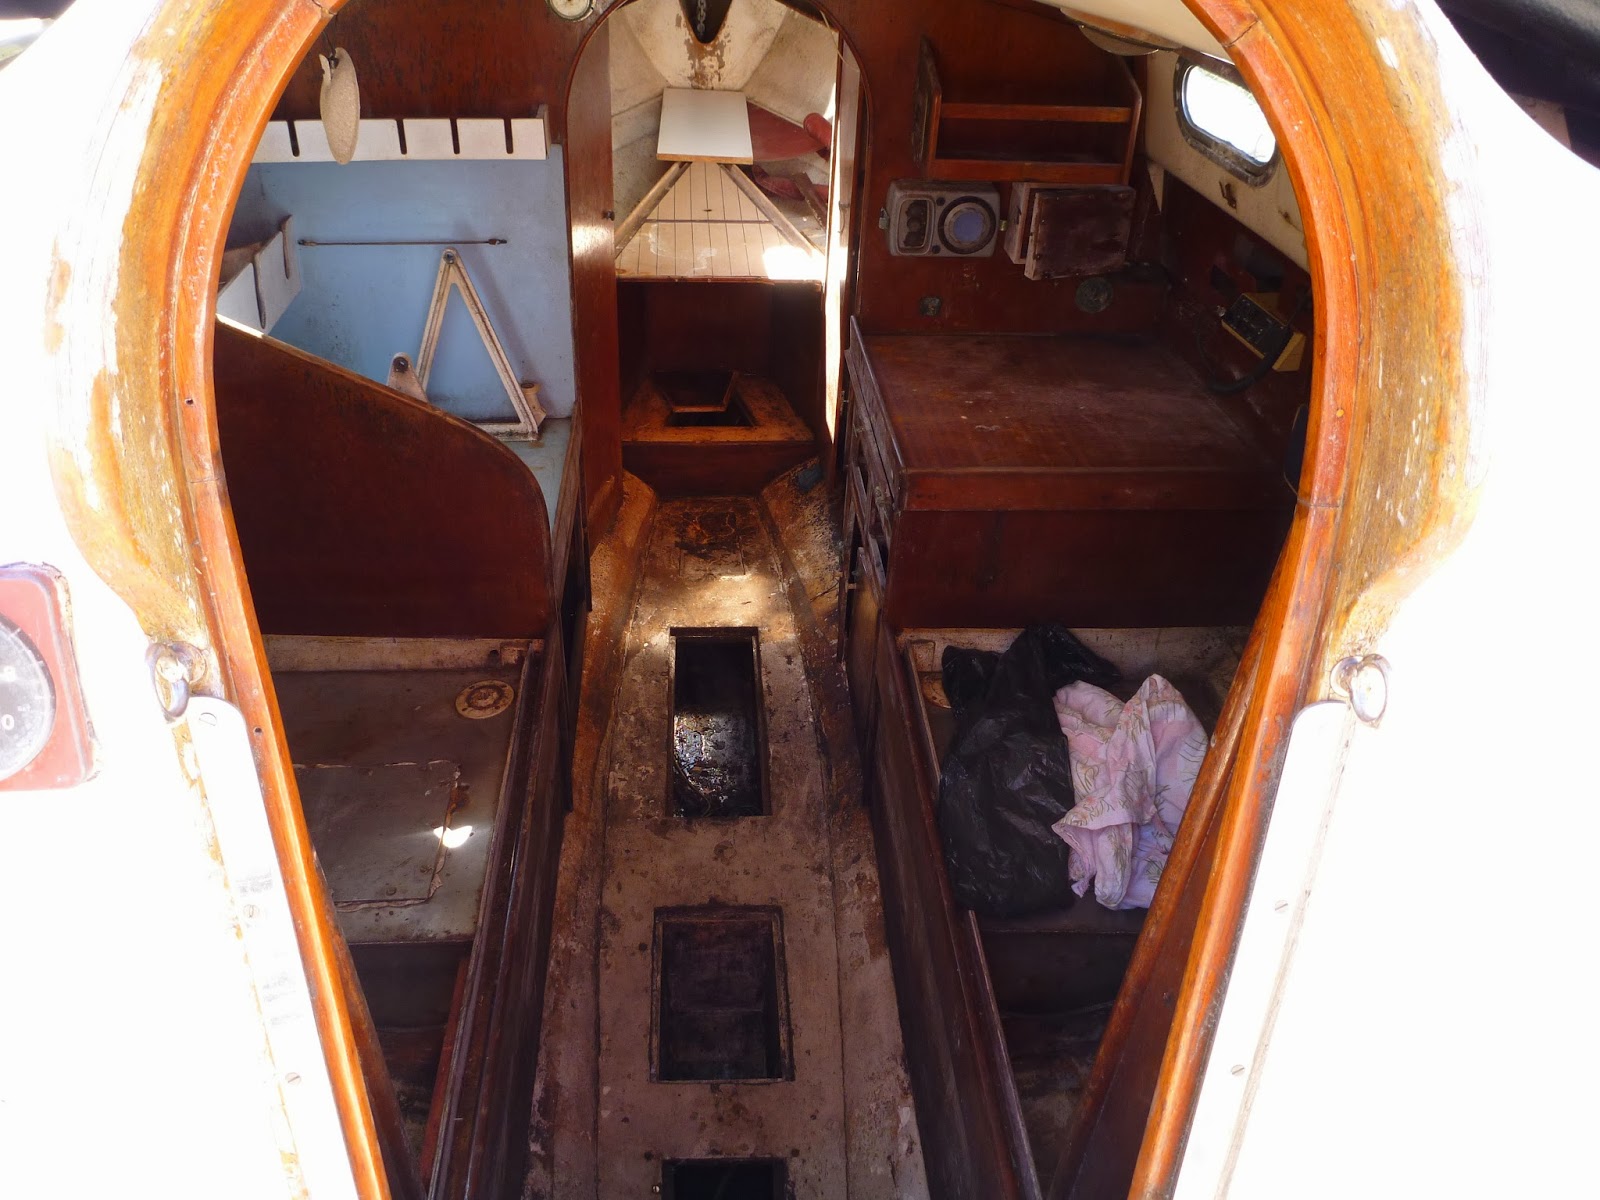
Firstly, with the bow now properly supported, I got right up into the fore cabin and commenced cleaning it out. Then I vacuumed up all of the bits of debris, working form stern to stem. She still needs a good scrub down, but that fun will come soon enough.


Then I turned my attention to the cockpit sole again. This has to be removed, so I can get the engine and stern gear out. After unsuccessfully hacking at the silicone goop around the edges of the sole for quite a while (man, that stuff is strong!), I decided to get a bit more aggressive. 


Plan B struck me as elegantly simple. Just slide the brace into the hole, stand across each seat and a gentle tug should surely see the floor lifted with ease. 


Unfortunately, whilst getting my stance nice and comfortable before the lift, I made the mistake of letting go of the rope. My 'ingenious-cockpit-sole-extraction-device' immediately fell down into the mysterious, dark recesses of the bilge, and absolutely stuck fast. No amount of jiggling, coaxing, swearing or dark, filthy looks helped. It was there for ever. 

Hmm, I thought......so its going to be like that, is it? Righto then, time for Plan C. 

This time I opted for something a bit stronger, and I was careful to keep a tight rein on it.


Then I tried to get a bit creative in setting up maximum force application, taking into consideration potential directional loading upon the system (sound smart, don't I?). 


Not wanting to give fate any ammunition at all, I also decided to utilise the port sheet winch for applying the tension. This sucker was coming up, one way or the other. 


After some messing around and minor tweaking, I was able to get some significant tension on the rig. But the sole would only come up a couple of millimetres. It was back to slicing and chopping at the white goop again, whilst keeping the tension on. 

I battled away for over another hour like that. I was about to give up and start on Plan D, when I tried cranking on even more pressure just one more time. With visions of deck fittings suddenly tearing loose and entering my temporal lobes at great velocity, I continued straining against the winch handle until I was finally rewarded by the sound of the sole slowly tearing free. 


At last I could look straight down onto the stern gear and aft end of the engine. Success sure tastes sweet, especially after a battle. 

I've read accounts of the deep, comfortable cockpits on these boats, and now I can understand the truth of them. Sitting on the seat and resting my feet on the flange from the original sole, I was surprised by just how natural and comfy the original set up is. I'll definitely be reinstating the proper level later.  


My next mission will be to remove the rudder, closely followed by the prop, shaft and then the engine. Then I can start on the water tanks. 


Saturday, August 31, 2013

Boat Stands

With Father's Day tomorrow, I won't be getting much done on the boat. So after work today I took a trip to Sydney, in order to pick up a crucial 'V-Top' boat stand for the bow. Due to lack of funds, I initially splurged out on only four main stands (plus a smaller keel stand), with the bow supported on a flimsy bit of timber. Still, the boat has seemed quite stable whilst I've been messing around on it up until now. She doesn't seem to move at all when the wind kicks up either. I haven't taken any chances with it though, and have avoided moving too far forward whenever aboard.


It's taken a while, but now I could finally afford at least one more stand (hence today's journey to the 'mad-house' of Sydney).


These things are expensive, but a bloody good bit of kit. I had played with various ideas for homemade alternatives, but in the end I figured that it wouldn't be worth the risk. Our son lives in the cabin right next to the boat. Plus the gas cylinders probably wouldn't be the best place to suddenly (and violently) park a boat on top of. I'll need a couple more stands for the sides sometime in the future, so I can move the existing ones around and get to the hull beneath. 

At least now I can get right up into the bow and remove the rest of the anchor chain, as well as have a good look around up in there. I'm also keen to get that mangled bow rail off. 


The stands are 'Brownell Boat Stands', which are made in the USA. Their agent here in Sydney is "Butchart Marine Services' (in Dee Why). Greg (the Managing Director) has been very professional and helpful. I couldn't be happier with these stands, and highly recommend them. 
(And no, I don't have any affiliation with these guys)


I'm less than happy with my keel support set up though. The forward part of the keel currently sits on a pile of hardwood fence post sections (formerly destined to be firewood). The aft section sits on an adjustable Brownell keel stand. This was so that I could adjust for the sloping and uneven ground. At some point I intend to source some big, thick solid bits of hardwood, and try to support the length of the keel more evenly. Hopefully I'm not distorting the hull at all.


Thursday, August 15, 2013

Cockpit Height Detective Work

I got a little bit more done over the weekend. The weather was stunning and it was hard to keep my mind on the job, rather than fantasising about being out on Broken Bay with the finished product (...sigh...one day).

Anyway, after uncovering the boat, I soon discovered a pleasant couple of 'firsts'. Small wins, granted, but you've got to take them when you can.

Firstly, there was no water sitting anywhere inside the hull. The bilge, cockpit lockers, everywhere, all dry (well, dryish). And a container of desiccant that I'd left in the bilge as a test, even had a bit of water trapped in it.


Secondly, as I'd been able to leave the washboards out and lockers open, I finally didn't have to wear a respirator when inside the cabin. Actually, I probably should still wear one because of the various flavours of potentially toxic mould that still adorns every surface, but at least there's no longer the overpowering stench of chemicals and decay in the atmosphere. In any case, I took my chances and refused to don one. I'll let you know if any funny little coughs develop.

Revelling in these new experiences, I happily went on to remove the last bits of crap that were still cluttering up Sentina's cabin. The rubbish pile is quite large now, and my little shed is crammed full with the stuff I can't/won't throw out. I think it could be time for a council rubbish pickup (better warn them to wear hazmat suits).


My main pressing issues now are to get the rest of the gelcoat off, and also to remove the large, fixed items (water tanks and engine/stern gear/etc). Since I'm still working on the best way to remove the gelcoat, I instead started trying to pull up the cockpit sole. By getting that out of the way, I'd have unfettered access to her engine and associated nether regions. I intend to raise the cockpit in the future anyway, to make it self-draining.

Surprisingly, all of the screws holding the sole down, came out quite easily. Even the last one, which is usually always a bastard. The silastic goo that sealed the edges proved another matter though. Good stuff, that. I'm going to have to cut it away, but I'll need a Stanley knife for that job (my old one's died).


With time starting to run short, I opted for a bit of exploring. After removing a cover piece that'd been screwed over the top of the engine, I was able to see the underneath side of the cockpit sole. What I saw make me think that perhaps someone in the past had already had a go at raising the sole's height. A redundant flange continued down past the floor on both sides, to where the original looks to have been located.


Fiona and Jeremy Rogers confirmed that the floor height has indeed been raised, and gave me tips on how to reinstate it to original configuration. They also helped with ideas on how to raise the cockpit the 'proper' way. Here's a couple of photos of their latest CO26 restoration (Grayling) where they did just that.


Looks pretty easy, right? How hard could it be? Just another little job. Tack it onto the list, I'll get around to it sometime........

Thursday, August 8, 2013

View photos at SlickPic.com


http://www.slickpic.com/s/IMMNIzMA3iONzO/RoninaRogersContessa26?preview

After Sales Service - 44 years later

Its been a bit quiet boat wise the last couple of weeks, but the weather forecast looks good for this weekend so I should be able to get a bit more work done. I haven' been completely idle however. I've located a mob in England (BPSC Marine) who can restore the Sestrel hand compass for around £120. Seems reasonable, although I don't know how much the shipping would cost yet. Still, it'd probably be worth it when I can afford to get it done (stop laughing).

I've also been in contact with the legendary team of Fiona and Jeremy Rogers (original builders), and they've been incredibly supportive. They've passed on a lot of really helpful information and tips. They've also sent me photos of a CO26 that they bought back and restored about 13 years ago called 'Rosina of Beaulieu' (see link to online album: 'Rosina - Rogers' Contessa 26'). Here's what Fiona had to say:


"He restored Rosina of Beaulieu, a 1974 boat, some 13 years ago, and she ended up looking like new.  She also became a famous Round-the-Island Race winner under our ownership, as she achieved an unprecedented three overall wins (2002 /03 /06)!  We then sold her and went on to restore a famous old Contessa 32, Gigi.  Now we’re back to Contessa 26 hull number 6, which originally belonged to the generous man who funded the tooling to set up production– without him nothing could have happened, and so it is highly appropriate that we should own and restore Grayling."
 The photos are a great source of inspiration at the moment, and I've made my keyboard quite soggy by drooling all over it whilst studying the shots. It seems hard to imagine that Sentina will one day look like this. 

They were also able to confirm some important data on my boat. Apparently she is Hull Number 49, and her class sail number is CO 150. She was built for a Mr. Wheatly, and a Bill of Sale was raised on 17 March 1969 for £2, 835.00. We believe she was sailed out to Australia by Mr John Lynton Moate. If there's anyone out there who might have any idea about who this guy is/was, then please do us a favour and let me know. I'd love to find out some details about this voyage. 


Monday, July 29, 2013

Osmosis - The battle Begins

Another spell of rain was predicted a few weeks ago, so I was reluctant to pull the tarp back on the boat. Instead I slowly went around the hull (yet again), inspecting every inch very closely. From the very beginning, I'd had no illusions about osmosis in Sentina. Its to be expected in a boat of this vintage. I knew she'd probably have it bad, and boy was I right. She seems to have a very advanced case of the dreaded pox.


As I was inspecting the hull, I noticed a little globule of water just hanging from the propellor aperture. There was no sign of run off on the hull's surface, and it hadn't rained all week. I also noted a bit of a puddle on the ground beneath this area. Looks like it'd been dripping for a while.


Detective that I am, I figured the water was coming out of the laminate. My earlier research into the treatment of serious osmosis cases, led me to understand that the entire gelcoat would have to be stripped off. Then the laminate underneath must be allowed to dry out, before rebuilding with barrier coats of epoxy. Apparently this is a bastard of a job, requiring the use of grinders and/or 'gelcoat peelers' (like an electric plane). When I made the decision to take this project on, I had naively figured I'd get this particular job done by professionals. Of course, in my financial situation, I now realise that this is not an option. I'll have to do the job myself. Since the gelcoat was already popping off in many places (presumably due to the hull shrinking as the water escaped), I decided to see if I could scrape some of it off by hand.

I grabbed an old paint scraper and had a bit of a dig into a blister.


The gelcoat easily came away, leaving the laminate exposed. I kept going along seams of loosened gelcoat. The exposed patch got bigger.


And bigger.


And bigger.


By the end of the afternoon, I'd gone down the entire starboard side of the hull. The laminate was absolutely soaked. I couldn't get it all, but I've made a significant dent in it. At least now the water can get away a lot more easily.

Yesterday I got stuck into the port side of the boat. As I suspected, the gelcoat didn't come away as easily here. I'm assuming that's because it gets a bit more sun on that side, and so is slightly drier. My scraper may have been a factor too (getting smaller and oddly shaped, from bits breaking off). Where I couldn't properly get underneath the gelcoat, I at least worked on opening up the blisters and letting the goo flow.


The blisters were pretty juicy little buggers too. Here's a short clip of the fun. I hope it works ok.


So if you're stupid enough to take on a project like this as well, and the hull is similarly delaminating, then the lesson learned is to make sure you try to get as much off as you can, as fast as you can. 

After the fun and games were over, I swept up all the fallen flakes of anti foul/celcoat from the ground and bagged it up. Then, not quite ready to knock off for the day, I began trying to clean up the compasses. They both look pretty knackered, but hopefully I can salvage at least one of them. 

I don't know anything about the box compass yet. There're actually stalactites hanging off the bowl underneath.


The hand bearing compass is a big old thing, that I've seen being used in a number of older voyaging/cruising books. I did some surfing on the net last night, and found out that its a 'Sestral' hand bearing compass, made by Henry Browne & son in England. Apparently they're a good bit of kit and quite expensive. Hopefully parts are still available, and I might be able to get it restored properly.


For now, I've pretty much drowned them both in WD40 and left them soaking. I'll keep you posted on any developments. 


Wednesday, July 24, 2013

Getting Sorted - Stage 1

Despite the stress of actually getting her here, I can't describe the joy of being able to look out of my window and see Sentina sitting in my yard. I have to pinch myself when I think about having my very own Contessa 26. I see her everyday. Since she's sitting right next to the car and bike, I pause and admire her curves every time I go out or get home. And every day I dream about being able to go sailing in her.


And she seems to have brought me a bit of good luck too. My work drought broke as soon as I got her here, finally securing a job shortly after she arrived. Its not exactly brain surgery and the pay is crap, but it's local, pays the bills and keeps me pretty busy. An abundance of overtime means that I only really get one day each week to be able to work on the boat (weather and commitments permitting), which really only turns out to be an afternoon per week, since I generally spend the mornings recovering and relaxing with the family. Still, its something, and I'm happy to say that I've been putting even that small amount of time to good use so far.

The first priority has been to get all of the foul water out of her. There was no opportunity to do this before she was transported, so it had been sloshing around inside her cabin all the way here. The stench when I opened her up was overpowering. I had to put a respirator on before I could climb down onto the bunks inside.


Because the water was obviously toxic, I didn't want to just dump it onto the ground. So I collected as many containers as I could and began hand-bailing the water into them. This was a pretty horrible and slow process, but eventually the water level got down to, and then below the floor boards. A few weeks later, and I could finally see the bottom of the bilge. I cleaned up a bit of the oily sludge from the cabin sole, and at last I could actually stand inside the cabin.


Of course there was also the matter of all the accumulated garbage inside the cabin. I spent quite a while removing this rubbish, salvaging anything that I thought would be remotely useable. However, most of it was a mass of oil/grease/mould soaked crap.


It wasn't all muck and gloom though. I managed to salvage a lot of useful paperwork (including items from the original sale to the very first owners) and manuals. There were old charts with position fixes marked, revealing some of her previous adventures. I also found the ship's compass and a big, classical old hand bearing compass (both surely antiques by now). I'm hoping that I can eventually get these last two items professionally restored, and put back aboard some day.


With the interior now cleared enough to be able to move around in, I turned my attention to above decks. The boat had a distinctly ratty, derelict appearance, and I wanted her to look a bit more loved. I went around and removed the lifelines and stanchions, as well as some deck hard wear. I also removed the anchor and about 25 meters of chain. At least she looks more presentable now.


I purchased a cheap pressure cleaner from Aldi, and then proceeded to blast Sentina's hull. The cleaner did a great job, removing the bits and barnacles that the boat yard had missed earlier. I was even able to get a few of the osmosis blisters to pop.


Next, I explored the dubious wonders of the lockers. Starting in the cockpit and working my way forward, I removed another conglomerated mass of wet, greasy 'God-knows-whats'. I was glad to have gotten that bit done, because there was a lot of sitting water in those lockers as well. The underneath sides of the bunk boards in the cabin were covered in a wet, clear, glutinous, phlegmy goo. No wonder the poor old girl is so water logged.


Sentina's cockpit floor is at/below the water line, so it drains into the bilge. That meant that I had to bail her out again every time it rained, which annoyed  me. With a predicted period of heavy and prolonged rain forecast, I bought a heavy duty tarpaulin and, using the boom as a ridge pole, secured it across the cockpit. I was glad I did this, because we really did cop a lot of rain afterwards. I enjoyed watching the water pour off that tarp during the week, but there was still some water sitting in the bilge when I got back aboard a couple of weeks later. I'll have to find where its still getting in.


Oh, and I also got all of the sails together and checked them out. Its a rag-tag collection of seemingly cheap, second-hand sails. All buggered, of course. I may be able to salvage a spinnaker or two, but it looks like Sentina will be getting a new suit of sails made one day (somehow).